

Telephony Servers Module Documentation
Table of Contents
Section titled “Table of Contents”- Navigation & Access
- Screenshots & Visual Interface
- 🎯 User Roles & Key Capabilities
- Module Overview (Technical)
- Module Overview (Commercial/Business)
- Module Overview (End User/Administrator)
- Configuration Sections
- Settings Reference
- Common Scenarios & Examples
- Model Context Protocol (MCP) AI Integration
- Limitations & Important Notes
- Troubleshooting Tips
- Glossary
Navigation & Access
Section titled “Navigation & Access”To access the Telephony Servers module:
- Log in to the Ring2All Web Portal (
https://<domain-or-ip>/login). - In the left navigation sidebar, expand Admin.
- Under System Settings, click Telephony Servers (
/admin/system-settings/telephony-servers). - To register a new telephony server, click the + Add Server button (
/admin/system-settings/telephony-servers/new). - To view, edit, duplicate, or test connections to an existing server, click on the server name or the action icons in the table row (
/admin/system-settings/telephony-servers/:id).
Screenshots & Visual Interface
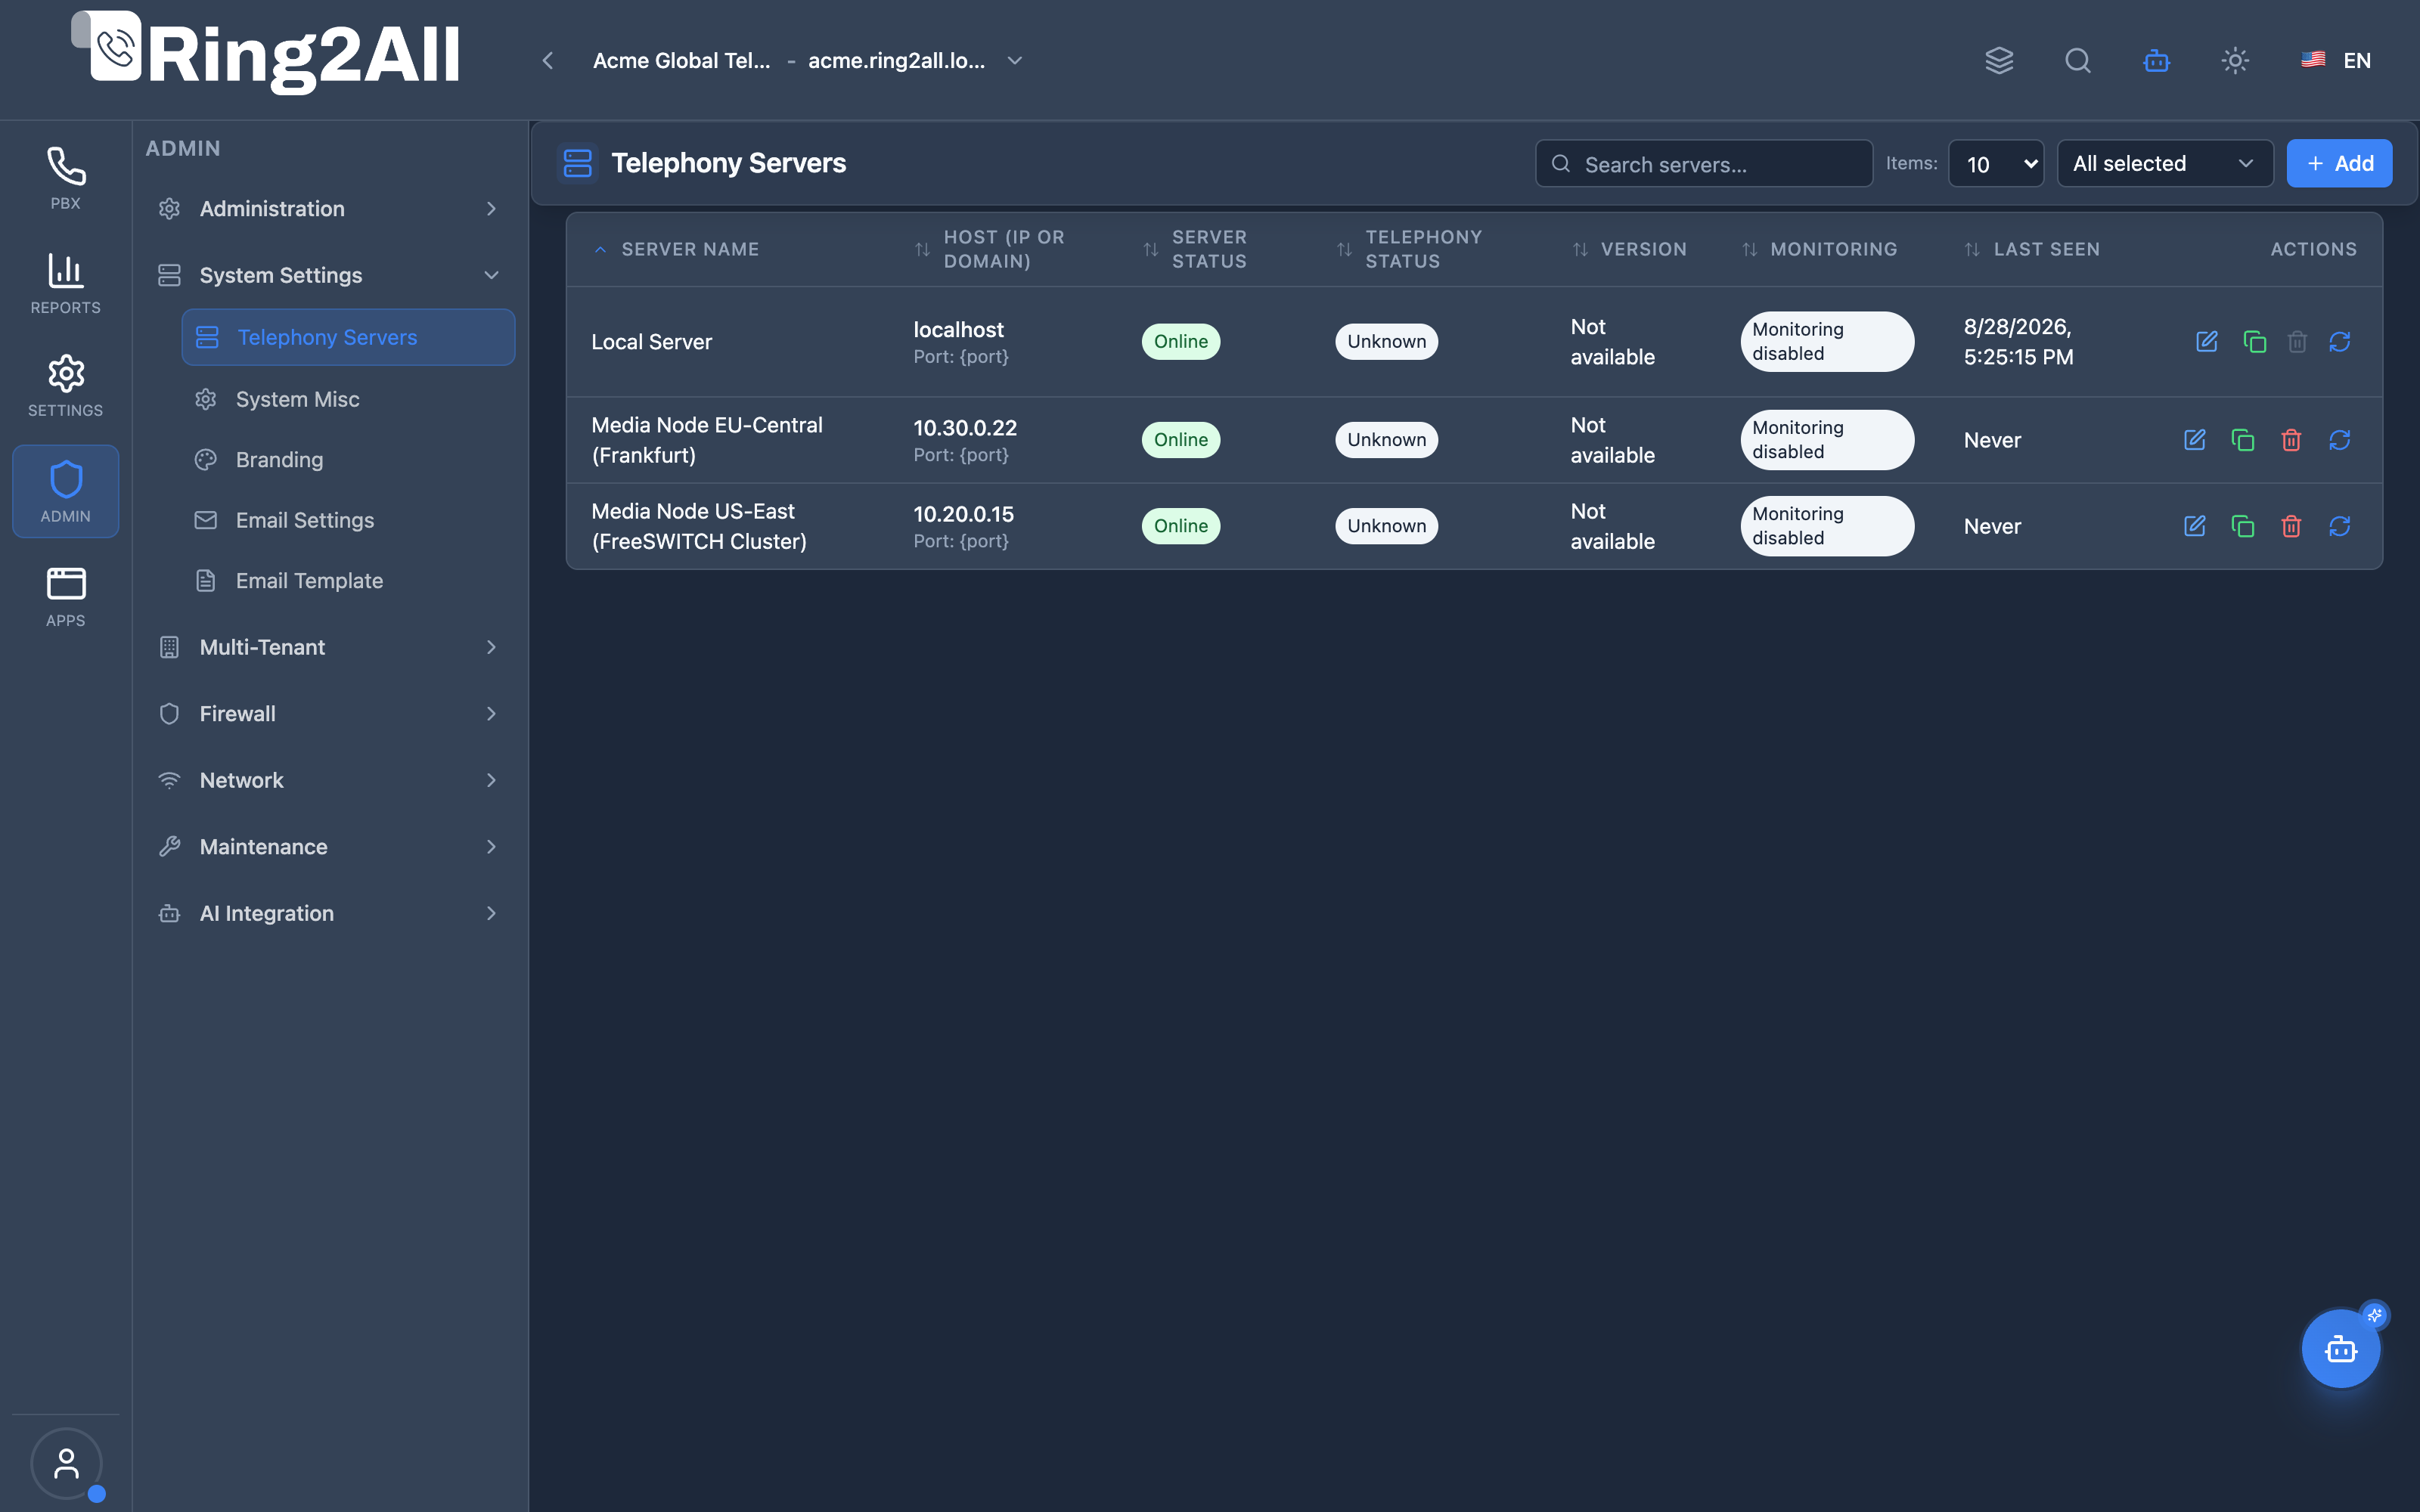
Section titled “Screenshots & Visual Interface”Telephony Servers List View
Section titled “Telephony Servers List View”The Telephony Servers dashboard displays all registered Telephony Server media nodes, cluster instances, and local server profiles with their hostnames, IP addresses, SSH credentials, ESL connection ports, server statuses, and health monitoring metrics.
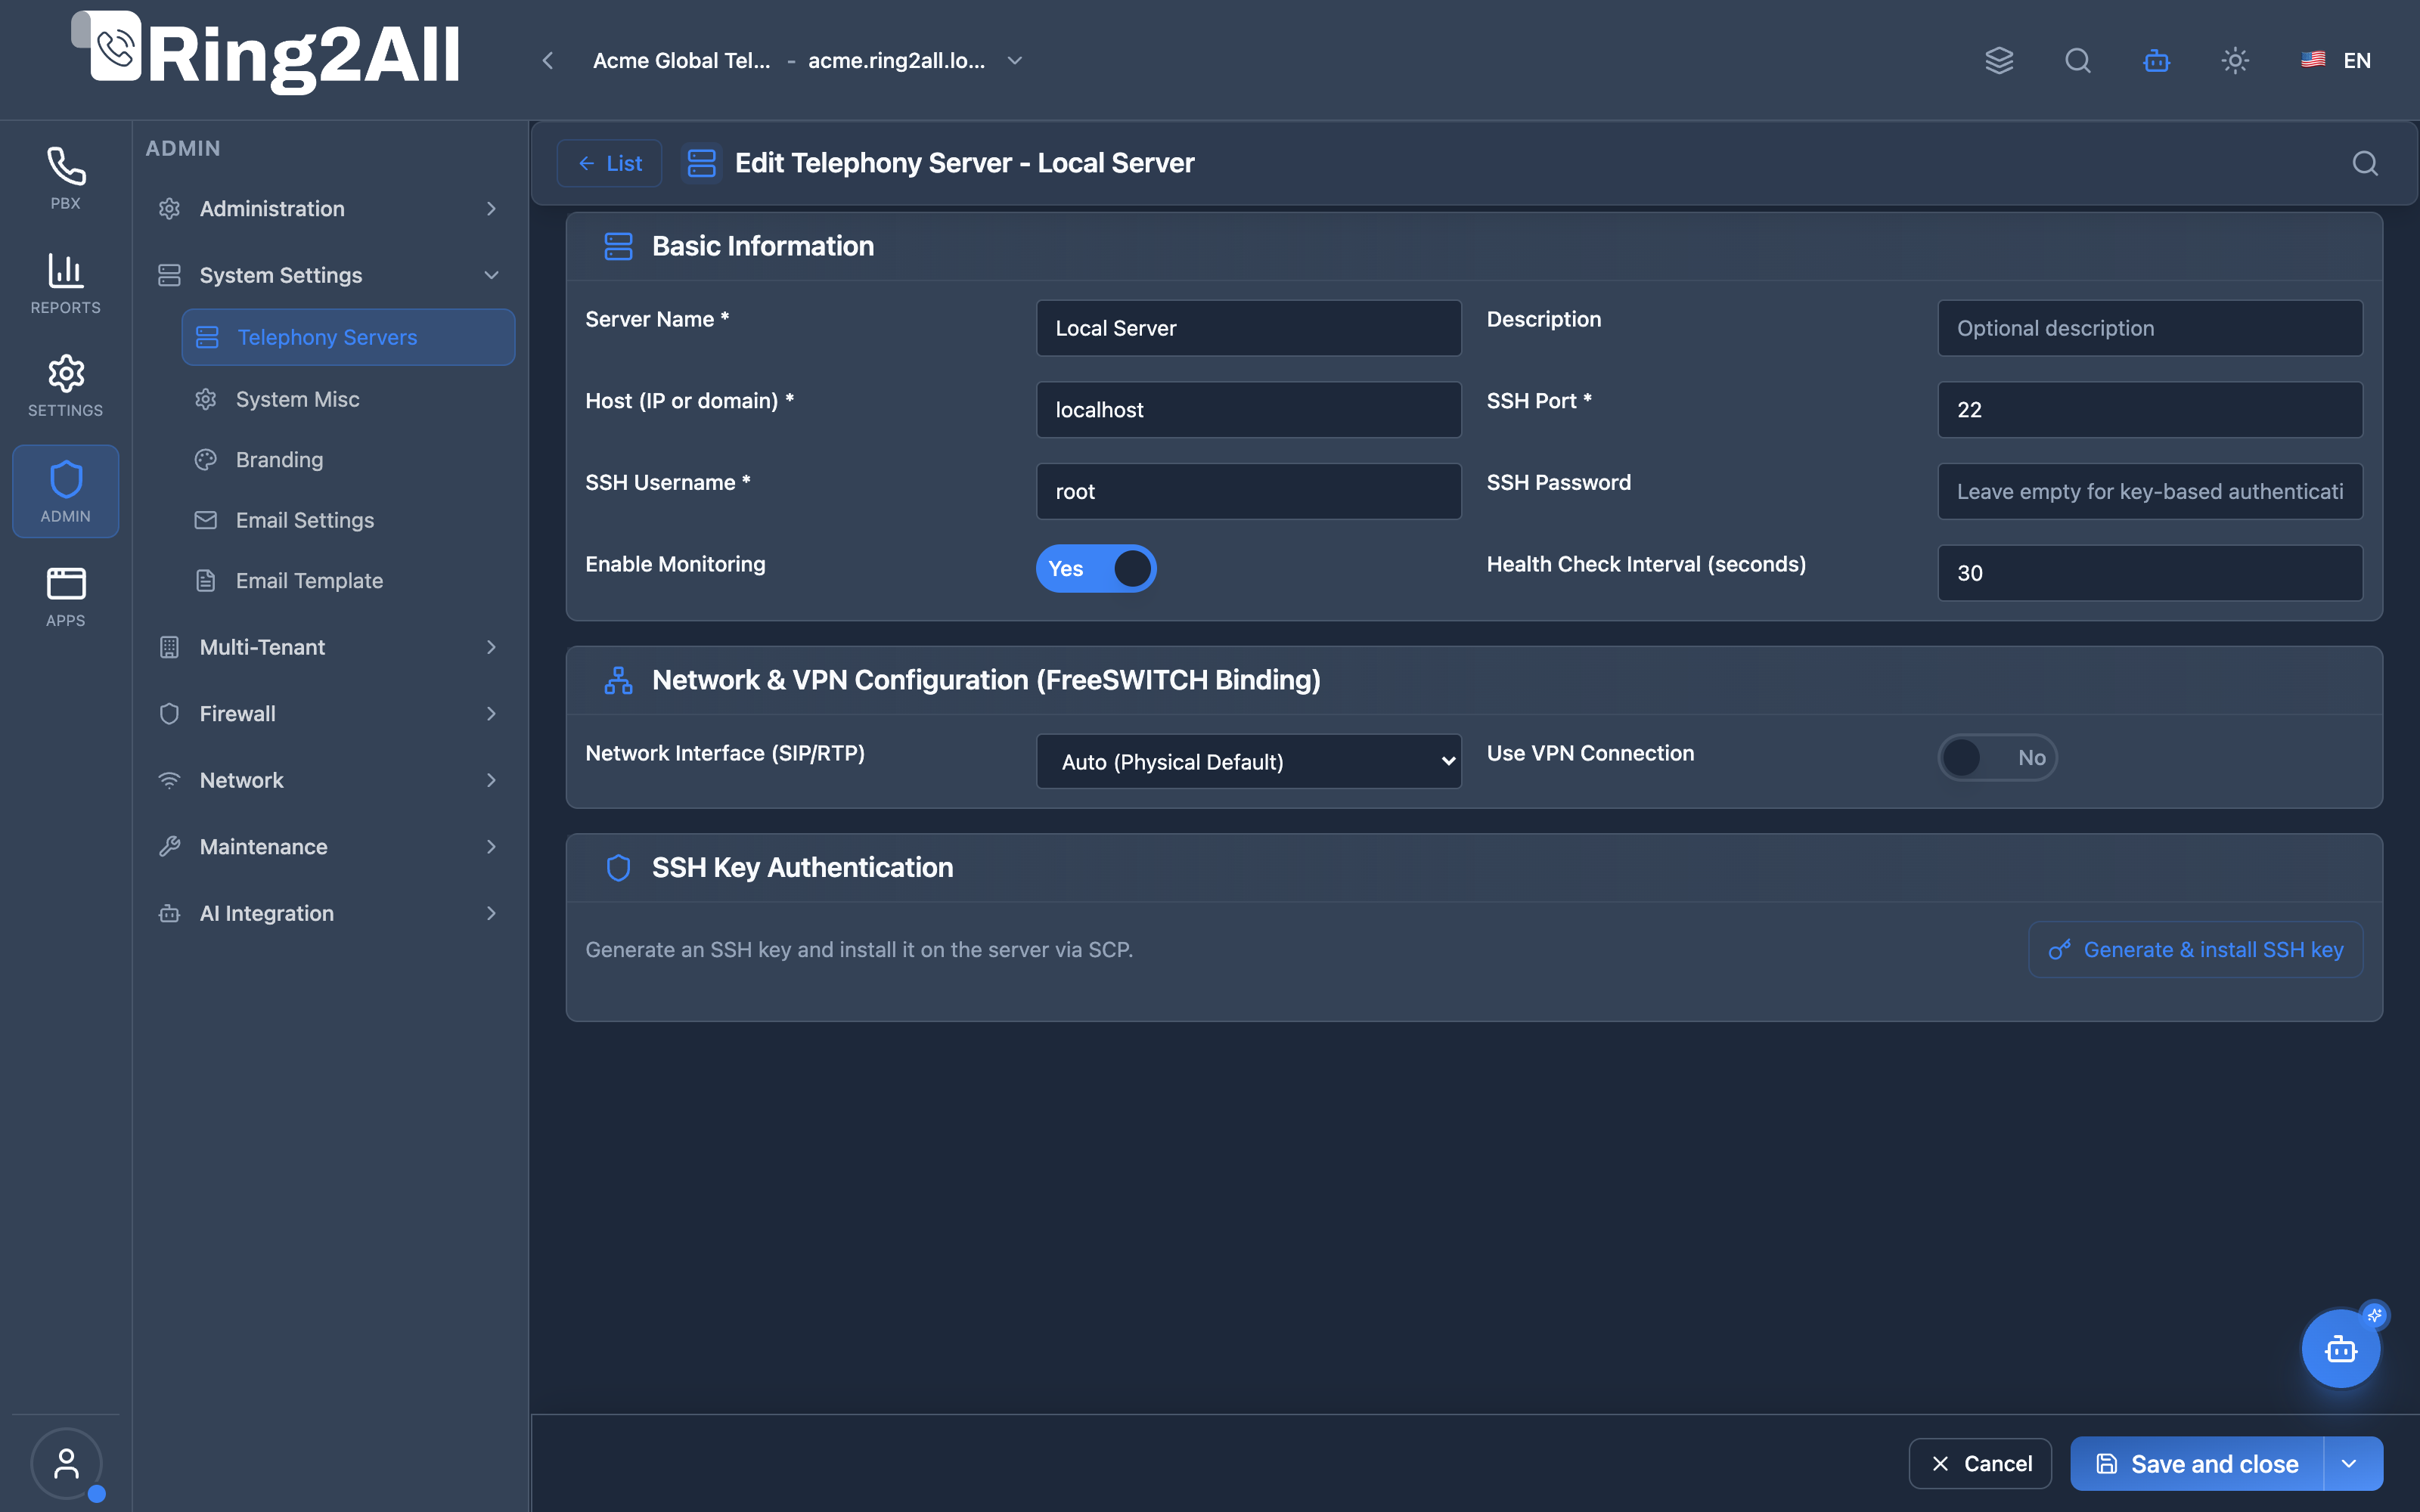
Telephony Server Configuration Form
Section titled “Telephony Server Configuration Form”The server configuration form provides detailed parameters to manage SSH credentials, key-pair generation, Event Socket Layer (ESL) authentication, heartbeat intervals, and VPN routing bindings.
🎯 User Roles & Key Capabilities
Section titled “🎯 User Roles & Key Capabilities”The Telephony Servers module oversees high-availability media nodes and server infrastructure across the cluster:
| Role | Key Capabilities & Operational Scope |
|---|---|
| Super Administrator / Infrastructure Architect | Adds new Telephony Server media nodes, generates cluster SSH keys, configures WireGuard VPN bindings, tests ESL socket connections, and manages failover nodes. |
| VoIP / PBX Systems Engineer | Monitors media node status, checks Telephony Server telephony uptime, inspects ESL port connectivity, and troubleshoots server heartbeat check timeouts. |
| NOC Operator / Telephony Supervisor | Observes real-time cluster health indicators (Online, Degraded, Offline) and receives automated alerts if a telephony node stops responding. |
| Telephony Auditor (Read-Only) | Examines registered server node inventories, VPN IPs, and health check intervals without access to SSH credentials or restart actions. |
1. Module Overview (Technical)
Section titled “1. Module Overview (Technical)”What Are Telephony Servers?
Section titled “What Are Telephony Servers?”Telephony Servers is a Telephony Server management module that configures connections to one or more telephony servers. It supports SSH authentication (password or key-based) and periodic health monitoring.
Architecture
Section titled “Architecture”┌─────────────────────────────────────────────────────────────────┐│ Telephony Servers Architecture │├─────────────────────────────────────────────────────────────────┤│ ││ Ring2All Admin Panel ││ ┌──────────────────────────────────────────────────────────┐ ││ │ Telephony Servers Module │ ││ │ │ ││ │ Server Entry: │ ││ │ ├─ Name: FS Node 01 │ ││ │ ├─ Host: 192.168.1.100 │ ││ │ ├─ SSH Port: 22 │ ││ │ ├─ SSH User: root │ ││ │ ├─ Auth: SSH Key (auto-generated) │ ││ │ ├─ Bind Interface: WireGuard (wg0) / Auto / Custom │ ││ │ ├─ VPN Tunnel: Enabled (10.100.0.10) │ ││ │ ├─ Monitoring: Enabled │ ││ │ └─ Health Check: 30 seconds │ │
│ │ │ ││ └──────────────────────────────────────────────────────────┘ ││ │ ││ ▼ SSH Connection ││ ┌──────────────────────────────────────────────────────────┐ ││ │ Telephony Server │ ││ │ │ ││ │ ├─ Execute fs_cli commands │ ││ │ ├─ Deploy configuration files │ ││ │ ├─ Retrieve status information │ ││ │ └─ Restart services │ ││ │ │ ││ └──────────────────────────────────────────────────────────┘ ││ │ ││ ▼ Health Monitoring ││ ┌──────────────────────────────────────────────────────────┐ ││ │ Server Status │ ││ │ │ ││ │ ├─ Online / Offline │ ││ │ ├─ Telephony Server version │ ││ │ ├─ Telephony status │ ││ │ └─ Last seen timestamp │ ││ │ │ ││ └──────────────────────────────────────────────────────────┘ ││ │└─────────────────────────────────────────────────────────────────┘2. Module Overview (Commercial/Business)
Section titled “2. Module Overview (Commercial/Business)”Business Value
Section titled “Business Value”Telephony Servers provides multi-server management:
| Without Telephony Servers | With Telephony Servers |
|---|---|
| Single server | Multiple servers |
| Manual SSH | Automated connection |
| Password auth | Key-based security |
| No monitoring | Health checks |
Use Cases
Section titled “Use Cases”-
Multi-Server Cluster
- Manage multiple Telephony nodes
- Distributed architecture
-
Remote Servers
- Cloud-hosted telephony
- Geographically distributed
-
Server Monitoring
- Uptime tracking
- Status dashboard
-
Secure Access
- SSH key authentication
- Passwordless operation
Feature Highlights
Section titled “Feature Highlights”| Feature | Benefit |
|---|---|
| Multi-Server | Manage cluster |
| SSH Key Auth | Secure, automated |
| Auto Key Install | One-click setup |
| Health Checks | Monitor uptime |
| Status Display | Online/Offline/Error |
| Quick List | Fast server switching |
3. Module Overview (End User/Administrator)
Section titled “3. Module Overview (End User/Administrator)”What Can You Do?
Section titled “What Can You Do?”- Add telephony servers
- Configure SSH connection details
- Generate and install SSH keys
- Enable/disable monitoring
- Set health check intervals
- View server status
- Check Telephony Server version
Telephony Servers Interface
Section titled “Telephony Servers Interface”┌─────────────────────────────────────────────────────────────────┐│ Telephony Servers │├─────────────────────────────────────────────────────────────────┤│ ││ Manage Telephony Servers and connections ││ ││ [+ Add Server] ││ ││ [🔍 Search servers...] ││ ││ ┌───────────────────────────────────────────────────────────┐ ││ │ Server Name │ Host │ Status │ Version │ Mon │ ││ ├───────────────┼───────────────┼─────────┼─────────┼──────┤ ││ │ FS Node 01 │ 192.168.1.100 │ ●Online │ 1.10.9 │ ✓ │ ││ │ FS Node 02 │ 192.168.1.101 │ ●Online │ 1.10.9 │ ✓ │ ││ │ Backup Server │ 10.0.0.50 │ ○Offline│ - │ ✓ │ ││ │ Dev Server │ dev.local │ ●Online │ 1.10.7 │ ☐ │ ││ └───────────────────────────────────────────────────────────┘ ││ │└─────────────────────────────────────────────────────────────────┘Add/Edit Server
Section titled “Add/Edit Server”┌─────────────────────────────────────────────────────────────────┐│ Add Telephony Server │├─────────────────────────────────────────────────────────────────┤│ ││ ▼ Basic Information ││ ││ Server Name: [FS Node 01 ] ││ Friendly name for identifying this server ││ ││ Description: [Production telephony node ] ││ Optional description ││ ││ Host (IP or domain): [192.168.1.100 ] ││ Server IP address or DNS hostname ││ ││ SSH Port: [22 ] ││ Default port is 22 ││ ││ SSH Username: [root ] ││ User account for SSH access ││ ││ SSH Password: [•••••••• ] ││ Leave blank for key-based authentication ││ ││ ──────────────────────────────────────────────────────────────││ ││ ▼ SSH Key Authentication ││ ││ [🔑 Generate & install SSH key] ││ Create and deploy a unique SSH key for this server ││ ││ Status: SSH key installed on the server. ││ ││ ──────────────────────────────────────────────────────────────││ ││ Enable Monitoring: ✓ ││ Enable periodic health checks for this server ││ ││ Health Check Interval: [30 ] seconds ││ Time interval between monitoring checks ││ ││ [Save] [Cancel] ││ │└─────────────────────────────────────────────────────────────────┘SSH Key Generation
Section titled “SSH Key Generation”┌─────────────────────────────────────────────────────────────────┐│ SSH Key Authentication │├─────────────────────────────────────────────────────────────────┤│ ││ [🔑 Generate & install SSH key] ││ ││ Status: ✓ SSH key installed on the server. ││ ││ ────────────────────────────────────────────────────────────── ││ ││ SSH key installed on the server ││ The SSH key is ready for secure authentication. ││ ││ Test the connection: ││ ssh root@192.168.1.100 ││ ││ No additional steps are required. ││ │└─────────────────────────────────────────────────────────────────┘Quick Tips
Section titled “Quick Tips”[!TIP] SSH Keys: Use key-based auth for automated operations.
[!TIP] Monitoring: Enable to track server uptime.
[!NOTE] Local Server: Local servers cannot be deleted.
4. Configuration Sections
Section titled “4. Configuration Sections”Basic Information
Section titled “Basic Information”| Field | Description |
|---|---|
| Server Name | Identifier (e.g., “FS Node 01”) |
| Description | Purpose notes |
| Host | IP or hostname |
| SSH Port | SSH port (default 22) |
| SSH Username | Login user |
| SSH Password | Optional password |
SSH Key Authentication
Section titled “SSH Key Authentication”| Field | Description |
|---|---|
| Generate & Install | Create and deploy SSH key |
| Status | Key installation status |
Monitoring
Section titled “Monitoring”| Field | Description |
|---|---|
| Enable Monitoring | Periodic health checks |
| Health Check Interval | Seconds between checks |
Network & VPN Configuration (Telephony Server Binding)
Section titled “Network & VPN Configuration (Telephony Server Binding)”| Field | Description | Supported Values / Notes |
|---|---|---|
| Bind Interface | Network interface Telephony Server binds for SIP/RTP traffic | auto (default public IP), wg0 (WireGuard), tun0 (OpenVPN), custom |
| Enable VPN | Toggle to route Telephony Server SIP media over secure VPN tunnel | Enabled (true) / Disabled (false) |
| VPN IP Address | Custom IP address of the target VPN interface | Optional IP address (e.g. 10.100.0.10) required when interface is set to custom or VPN is enabled |
Deep-Dive: Why is Network & VPN Binding Critical?
Section titled “Deep-Dive: Why is Network & VPN Binding Critical?”In enterprise VoIP environments, running Telephony nodes directly exposed to public IP addresses presents severe security risks and NAT complications:
- Protection Against SIP Scanners & Toll-Fraud: Exposing public SIP ports (
5060,5080) to the open Internet attracts automated scanners and brute-force toll-fraud bots. Binding Telephony Server exclusively to a VPN interface (wg0ortun0) keeps all SIP ports 100% closed to public Internet traffic. - Elimination of One-Way Audio (NAT Traversal): Traditional SIP traversals over home/corporate routers frequently cause silent calls or one-way audio due to aggressive ALG/NAT rewriting. Routing media over an encrypted VPN tunnel eliminates NAT manipulation completely.
┌─────────────────────────────────────────────────────────────────┐│ Telephony Server Network & VPN Binding Architecture │├─────────────────────────────────────────────────────────────────┤│ ││ Public Internet / Carrier Trunks ││ │ ││ ▼ SIP Port 5060 (TLS/UDP) ││ ┌──────────────────────────────────────────────────────────┐ ││ │ Ring2All SBC / Perimeter Security Boundary │ ││ └──────────────────────────────────────────────────────────┘ ││ │ ││ ▼ Encrypted Private WireGuard Tunnel (wg0) ││ ┌──────────────────────────────────────────────────────────┐ ││ │ Telephony Server (Telephony Node) │ ││ │ │ ││ │ Network & VPN Binding Configuration: │ ││ │ ├─ bindInterface: wg0 (WireGuard) │ ││ │ ├─ useVpn: true │ ││ │ └─ vpnIp: 10.100.0.10 │ ││ │ │ ││ │ Telephony Server SIP Profiles (internal / external): │ ││ │ ├─ sip-ip = 10.100.0.10 │ ││ │ ├─ rtp-ip = 10.100.0.10 │ ││ │ └─ Public Ports 5060/5080: CLOSED TO PUBLIC INTERNET │ ││ └──────────────────────────────────────────────────────────┘ ││ │└─────────────────────────────────────────────────────────────────┘Practical Use Cases
Section titled “Practical Use Cases”-
Use Case 1: Perimeter SBC & Internal Node Isolation The SBC receives public carrier traffic and relays it over the private
wg0WireGuard tunnel (10.100.0.X) to Telephony Server. The Telephony node does not require a public IP for telephony. -
Use Case 2: Multi-Cloud / Cross-Datacenter Interconnection Connect a Telephony node in AWS US-East to another node in Hetzner Europe over an encrypted WireGuard mesh network, guaranteeing zero packet tampering and sub-millisecond internal routing.
-
Use Case 3: Remote Branch PBX Connectivity Branch offices connect over an encrypted OpenVPN tunnel (
tun0). Telephony Server binds to10.8.0.1, guaranteeing full audio transparency regardless of local ISP NAT devices.
5. Settings Reference
Section titled “5. Settings Reference”Server Status Values
Section titled “Server Status Values”| Status | Icon | Description |
|---|---|---|
| Online | ● Green | Server responding |
| Offline | ○ Gray | Not reachable |
| Error | ● Red | Connection error |
| Unknown | ○ Gray | Not checked |
SSH Authentication Methods
Section titled “SSH Authentication Methods”| Method | Use Case |
|---|---|
| Password | Initial setup |
| SSH Key | Production (recommended) |
Health Check Intervals
Section titled “Health Check Intervals”| Interval | Use Case |
|---|---|
| 30 sec | High availability |
| 60 sec | Standard monitoring |
| 300 sec | Low priority servers |
6. Common Scenarios & Examples
Section titled “6. Common Scenarios & Examples”Scenario 1: Add Production Server
Section titled “Scenario 1: Add Production Server”- Click “Add Server”
- Name = “FS Prod 01”
- Host = production server IP
- SSH Port = 22
- SSH Username = root
- Click “Generate & install SSH key”
- Enable Monitoring
- Health Check = 30 seconds
- Save
Scenario 2: Manual SSH Key
Section titled “Scenario 2: Manual SSH Key”- Add server with password first
- Generate SSH key
- If auto-install fails, copy key
- Manually add to server’s authorized_keys
- Clear password field
- Save
Scenario 3: Disable Monitoring
Section titled “Scenario 3: Disable Monitoring”- Edit server
- Uncheck “Enable Monitoring”
- Save
- Server won’t be health-checked
Scenario 4: Change Health Interval
Section titled “Scenario 4: Change Health Interval”- Edit server
- Set Health Check Interval = 60
- Save
- Checks now every 60 seconds
Model Context Protocol (MCP) AI Integration
Section titled “Model Context Protocol (MCP) AI Integration”The Ring2All PBX platform exposes Model Context Protocol (MCP) tools for inspecting Telephony cluster infrastructure and telephony server node health.
MCP Tools Reference
Section titled “MCP Tools Reference”| Tool Name | Operation | Description | Risk Level |
|---|---|---|---|
list_telephony_servers |
Read | Lists all registered Telephony Server/telephony nodes, IP hosts, ports, and cluster status. | Low |
get_telephony_server_status |
Read | Retrieves connection state, ESL ports, and health diagnostics for a specific telephony node. | Low |
JSON Schema Definitions
Section titled “JSON Schema Definitions”list_telephony_servers
Section titled “list_telephony_servers”{ "name": "list_telephony_servers", "description": "Lists all registered Telephony Server/telephony server nodes.", "parameters": { "type": "object", "properties": { "search": { "type": "string", "description": "Filter by server name or host IP" } } }}get_telephony_server_status
Section titled “get_telephony_server_status”{ "name": "get_telephony_server_status", "description": "Retrieves connection state and health diagnostics for a telephony server node.", "parameters": { "type": "object", "properties": { "server_id": { "type": "number", "description": "Internal server node identifier" }, "name": { "type": "string", "description": "Server node display name or host IP" } } }}Natural Language Prompt Examples
Section titled “Natural Language Prompt Examples”English
Section titled “English”- “List all telephony servers in the cluster and check if any are currently offline.”
- “What is the ESL connection port and status for telephony server ‘FS Node 01’?”
- “Check the WireGuard VPN binding IP for the primary media node.”
Spanish
Section titled “Spanish”- “Muestra todos los servidores de telefonía del clúster y su estado de conexión.”
- “¿Está en línea el servidor Telephony Server local y cuál es su tiempo de actividad?”
- “Consulta el puerto ESL y estado de monitoreo del nodo ‘FS Node 02’.”
Enterprise Safeguards & Guardrails
Section titled “Enterprise Safeguards & Guardrails”- Local Server Immutability: The primary local telephony server node cannot be deleted.
- Credential Redaction: SSH passwords and private SSH keys are strictly redacted and never returned in MCP outputs.
- Fail-Safe Fallback: If health checks cannot be performed synchronously, the system reports last-known status with a warning flag.
7. Limitations & Important Notes
Section titled “7. Limitations & Important Notes”Technical Notes
Section titled “Technical Notes”[!NOTE] Network Access: Server must be reachable from admin panel.
[!NOTE] SSH Access: User needs appropriate permissions.
[!WARNING] Local Server: Cannot be deleted (system server).
Best Practices
Section titled “Best Practices”- Use SSH Keys: More secure than passwords
- Enable Monitoring: Track uptime
- Descriptive Names: “FS-Prod-US-East-01”
- Dedicated User: Use non-root when possible
- Firewall Rules: Allow SSH from admin panel
SSH Key Benefits
Section titled “SSH Key Benefits”| Benefit | Description |
|---|---|
| Security | No password exposure |
| Automation | Passwordless scripts |
| Rotation | Easy key replacement |
| Audit | Track key usage |
8. Troubleshooting Tips
Section titled “8. Troubleshooting Tips”Common Issues
Section titled “Common Issues”| Symptom | Possible Cause | Solution |
|---|---|---|
| Offline status | Server down | Check server |
| SSH connection failed | Wrong credentials | Verify user/password |
| Key install failed | SSH blocked | Check firewall |
| Can’t delete | Local server | Local cannot be deleted |
Test SSH Connection
Section titled “Test SSH Connection”# Test SSH manuallyssh -p 22 root@192.168.1.100
# Test with verbose outputssh -v root@192.168.1.100
# Test key authenticationssh -i /path/to/key root@192.168.1.100Check Server Status
Section titled “Check Server Status”SELECT name, host, ssh_port, status, last_seen, monitoring_enabledFROM public.telephony_serversORDER BY name;Telephony Server Status
Section titled “Telephony Server Status”# Check Telephony Server is runningsystemctl status freeswitch
# Check versionfs_cli -x "version"9. Glossary
Section titled “9. Glossary”| Term | Definition |
|---|---|
| Telephony Server | Telephony Server host |
| SSH | Secure Shell protocol |
| SSH Key | Public/private key pair |
| Health Check | Periodic status verification |
| Cluster | Multiple connected servers |
| fs_cli | Telephony Server command line |
Documentation last updated: January 2026